On this page
Trackside Setup — the seven-section editor at the circuit
Your setup is the record of how the kart is actually built: what the front end is set to, where the seat sits, what is on the axle, what is in the tyres. Between sessions you change one or two of those things, and you need to write down what you changed before you forget. The trackside setup editor is that record, on a phone — a picker listing every setup you have, and inside one of them seven sections covering the whole kart.
This chapter covers trackside — the phone-first Apex app you use at the circuit. For how setups cascade — track defaults, event overrides and session overrides — see Setups; that is a dashboard idea, and this chapter covers editing one setup on a phone.
Throughout this chapter we follow Jordan Miles, our demo driver — an EKS Eagle at Go Kart Club of Victoria.
The setup we follow is Default Setup on #81 — Kart 81, marked dry, baseline and favourite. One picture in this chapter shows a different setup — one that has just been created and has nothing entered yet — and it says so where it appears.
Read this before you start editing. On a phone, moving between screens with unsaved changes throws them away without asking. There is no "you have unsaved changes" prompt here. Press Save Setup before you tap Setups, the back arrow or a tab. See Saving your changes.
What this is for
Use the trackside setup editor to:
- Look up what the kart is currently set to, without opening a laptop.
- Record a change you have just made in the pits — a click of castor, 5 mm on the rear track, a different sprocket — while you still remember it.
- See at a glance which parts of the kart you have filled in and which are still blank.
Every pressure on this screen is in PSI. Every length is in millimetres.
How to get here
Tap Setups in the bottom tab bar. That opens the picker; tap a setup to open the editor.
There is nothing to unlock — unlike the trackside tyre calculator, the setup screens are not part of a paid plan. They are, however, phone-only: ask for them on a laptop and Apex sends you to the dashboard Setups screen instead.
The setup picker
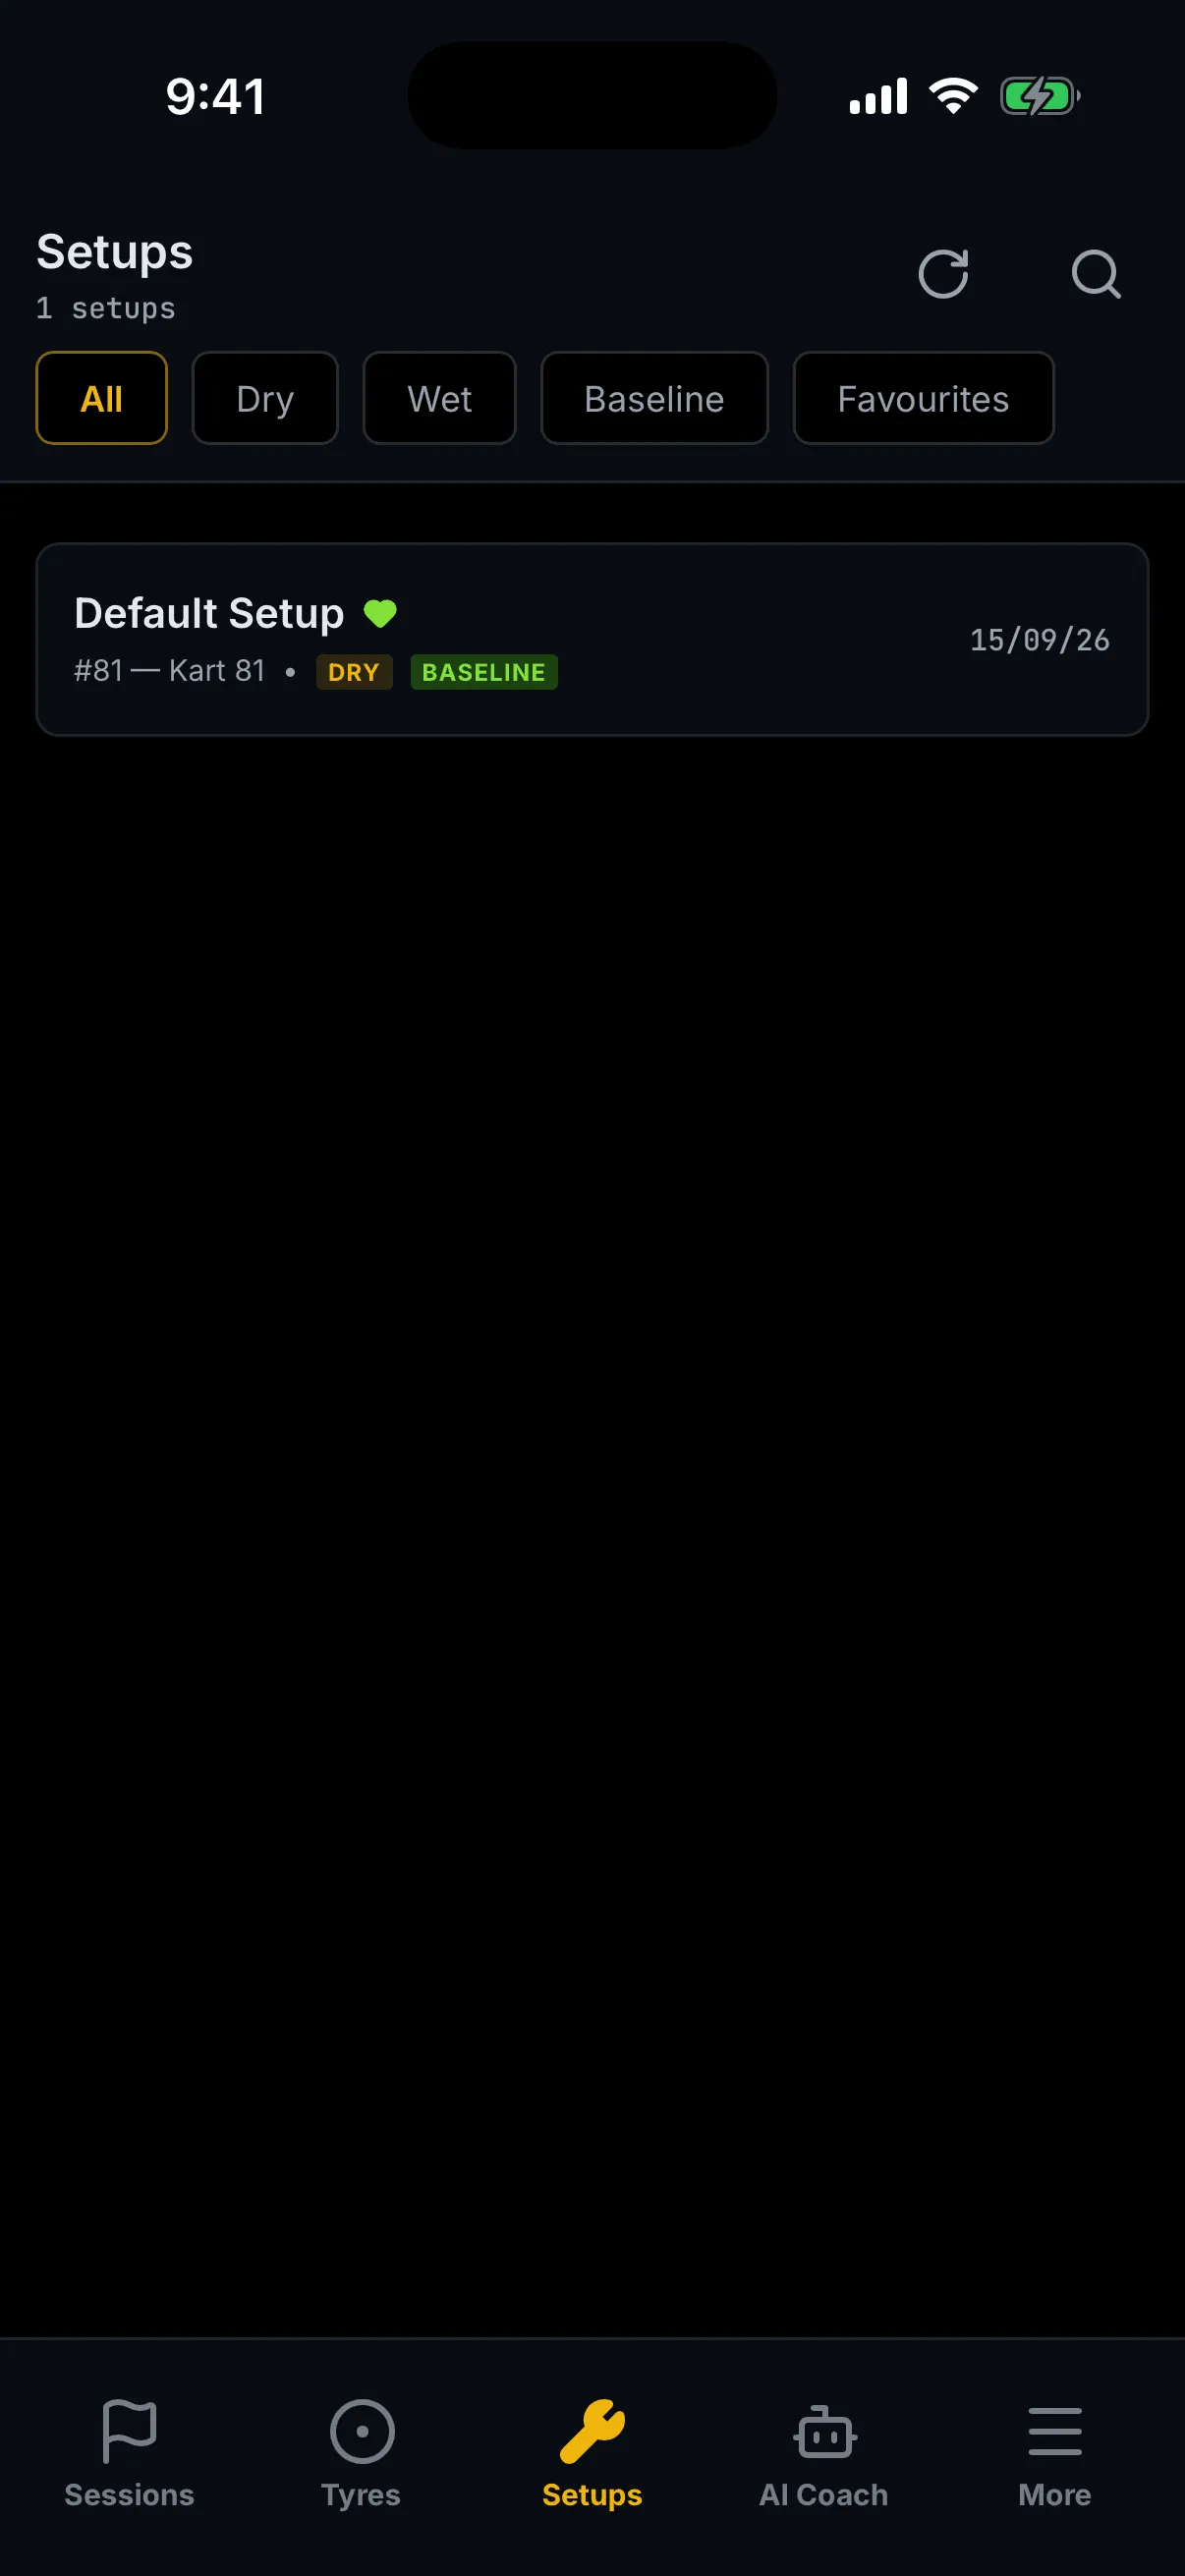
The picker lists every setup you have saved, newest information first, with the count beneath the title. Archived setups never appear.
Every element
The header. Setups, with two controls to its right: a refresh button, which spins whenever the list is loading — including by itself, in the background — and a search button. Search is hidden until you tap it. Tapping it again closes the field and clears what you typed.
Search looks at three things only: the setup name, the kart name and the kart number.
It does not search chassis, class or any of the values inside the setup. The kart number is stored
as a bare number, so search for 81, not #81.
The count. The line under the title reads 2 setups, or — once a chip or a search is
narrowing the list — 1 of 2 setups. It counts the setups on this screen.
The filter chips. Five, and only one is active at a time:
| Chip | Shows |
|---|---|
| All | every setup — the state the screen opens in |
| Dry | setups whose weather is Dry |
| Wet | setups whose weather is Wet |
| Baseline | setups marked as a baseline |
| Favourites | setups marked as a favourite |
Tapping a second chip replaces the first — you cannot ask for Wet and Favourites. A chip and the search box do combine.
A setup card. Each row is a link into the editor and shows:
- the setup name, with a green heart beside it when the setup is a favourite;
- the kart, as
#81 — Kart 81— the kart number and the kart name; - a weather badge,
DRYorWET, on every row; - a BASELINE badge, only when the setup is marked as one;
- the date it was last changed, on the right, as
15/09/26.
The heart, the badges and the date are labels, not controls. Tapping anywhere on the row — the heart included — opens the setup. To change whether a setup is a favourite, a baseline or dry, open it and use the toggles in its header.
When the list is empty, loading or broken
| You see | What it means | What to do |
|---|---|---|
| Four grey placeholder rows | The list is loading | Wait |
| No setups yet — "Create your first setup to start recording your kart configuration." | You have no setups at all | Tap Create setup |
| No matching setups — "Try a different name or filter." | Your chip or search matched nothing | Tap Clear search or Clear filter |
| Couldn't load setups — "Check your connection and try again." | The request failed | Tap Retry |
Create setup does not open a form. It creates a setup immediately — named Default Setup, marked Dry, not a baseline, not a favourite, attached to your primary kart — confirms with "Setup created." and opens it. Everything else is blank, and you fill it in from the editor. That is the one-tap route from nothing to a working setup.
The create button appears only when you have no setups at all. If you have setups but a filter is hiding them, you get No matching setups instead — clear the filter to get back.
The setup editor
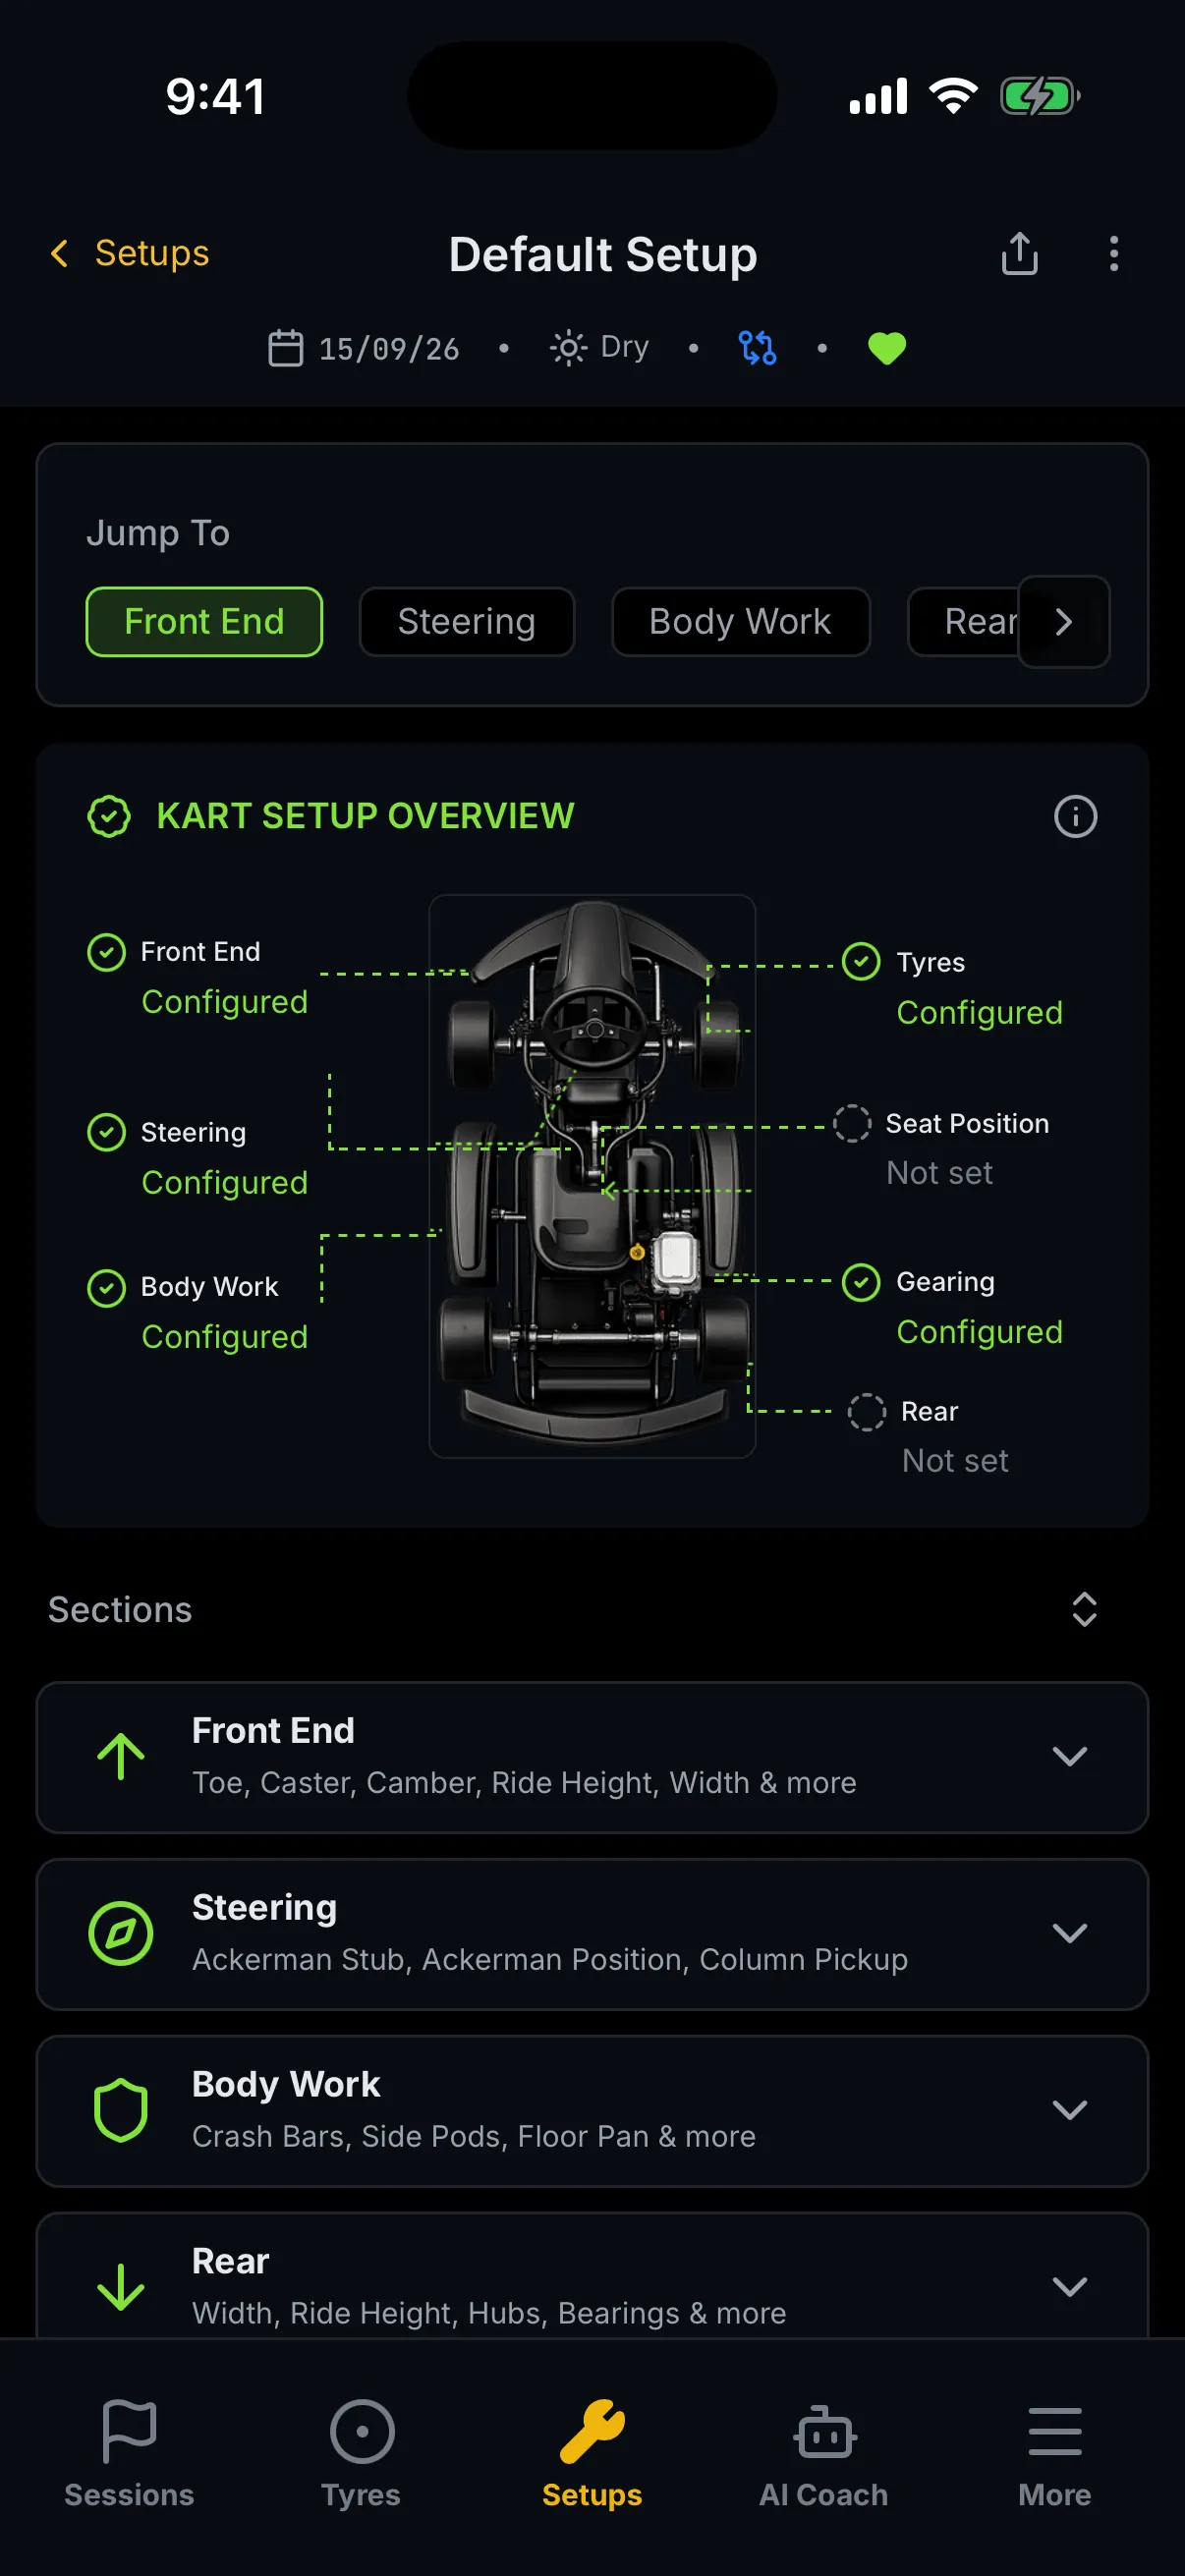
The editor opens with every section collapsed, so the first thing you see is the whole kart rather than one corner of it.
Every element
The header stays on screen as you scroll. It carries:
- ‹ Setups — back to the picker;
- the setup name. You cannot rename a setup here; renaming is on the dashboard;
- the circuit, beneath the name, when this setup is a track's default;
- Share, which offers the page link — through your phone's share sheet, or by copying it with "Link copied". It shares a link to your own Apex screen, not a public page;
- a three-dot button, which does nothing. It is drawn, and no menu is behind it.
The meta row under the name is four things, and three of them are switches:
| Control | Shows | Tap it to |
|---|---|---|
| Date | when the setup was last changed | — (not a control) |
| Dry / Wet | a sun or a rain cloud with the word beside it | switch between dry and wet |
| Baseline | a branch icon, blue when on | mark or unmark the setup as a baseline |
| Favourite | a heart, green when on | add or remove it from Favourites |
Tapping any of the three changes the setup, which means the Save Setup button at the foot of the page wakes up. Nothing is written until you press it.
If the setup will not load, you get "Couldn't load this setup." — "It may have been deleted, or your connection dropped." — and a Back to Setups button. The rail, the overview and the sections are all hidden; the header stays.
The Jump To rail
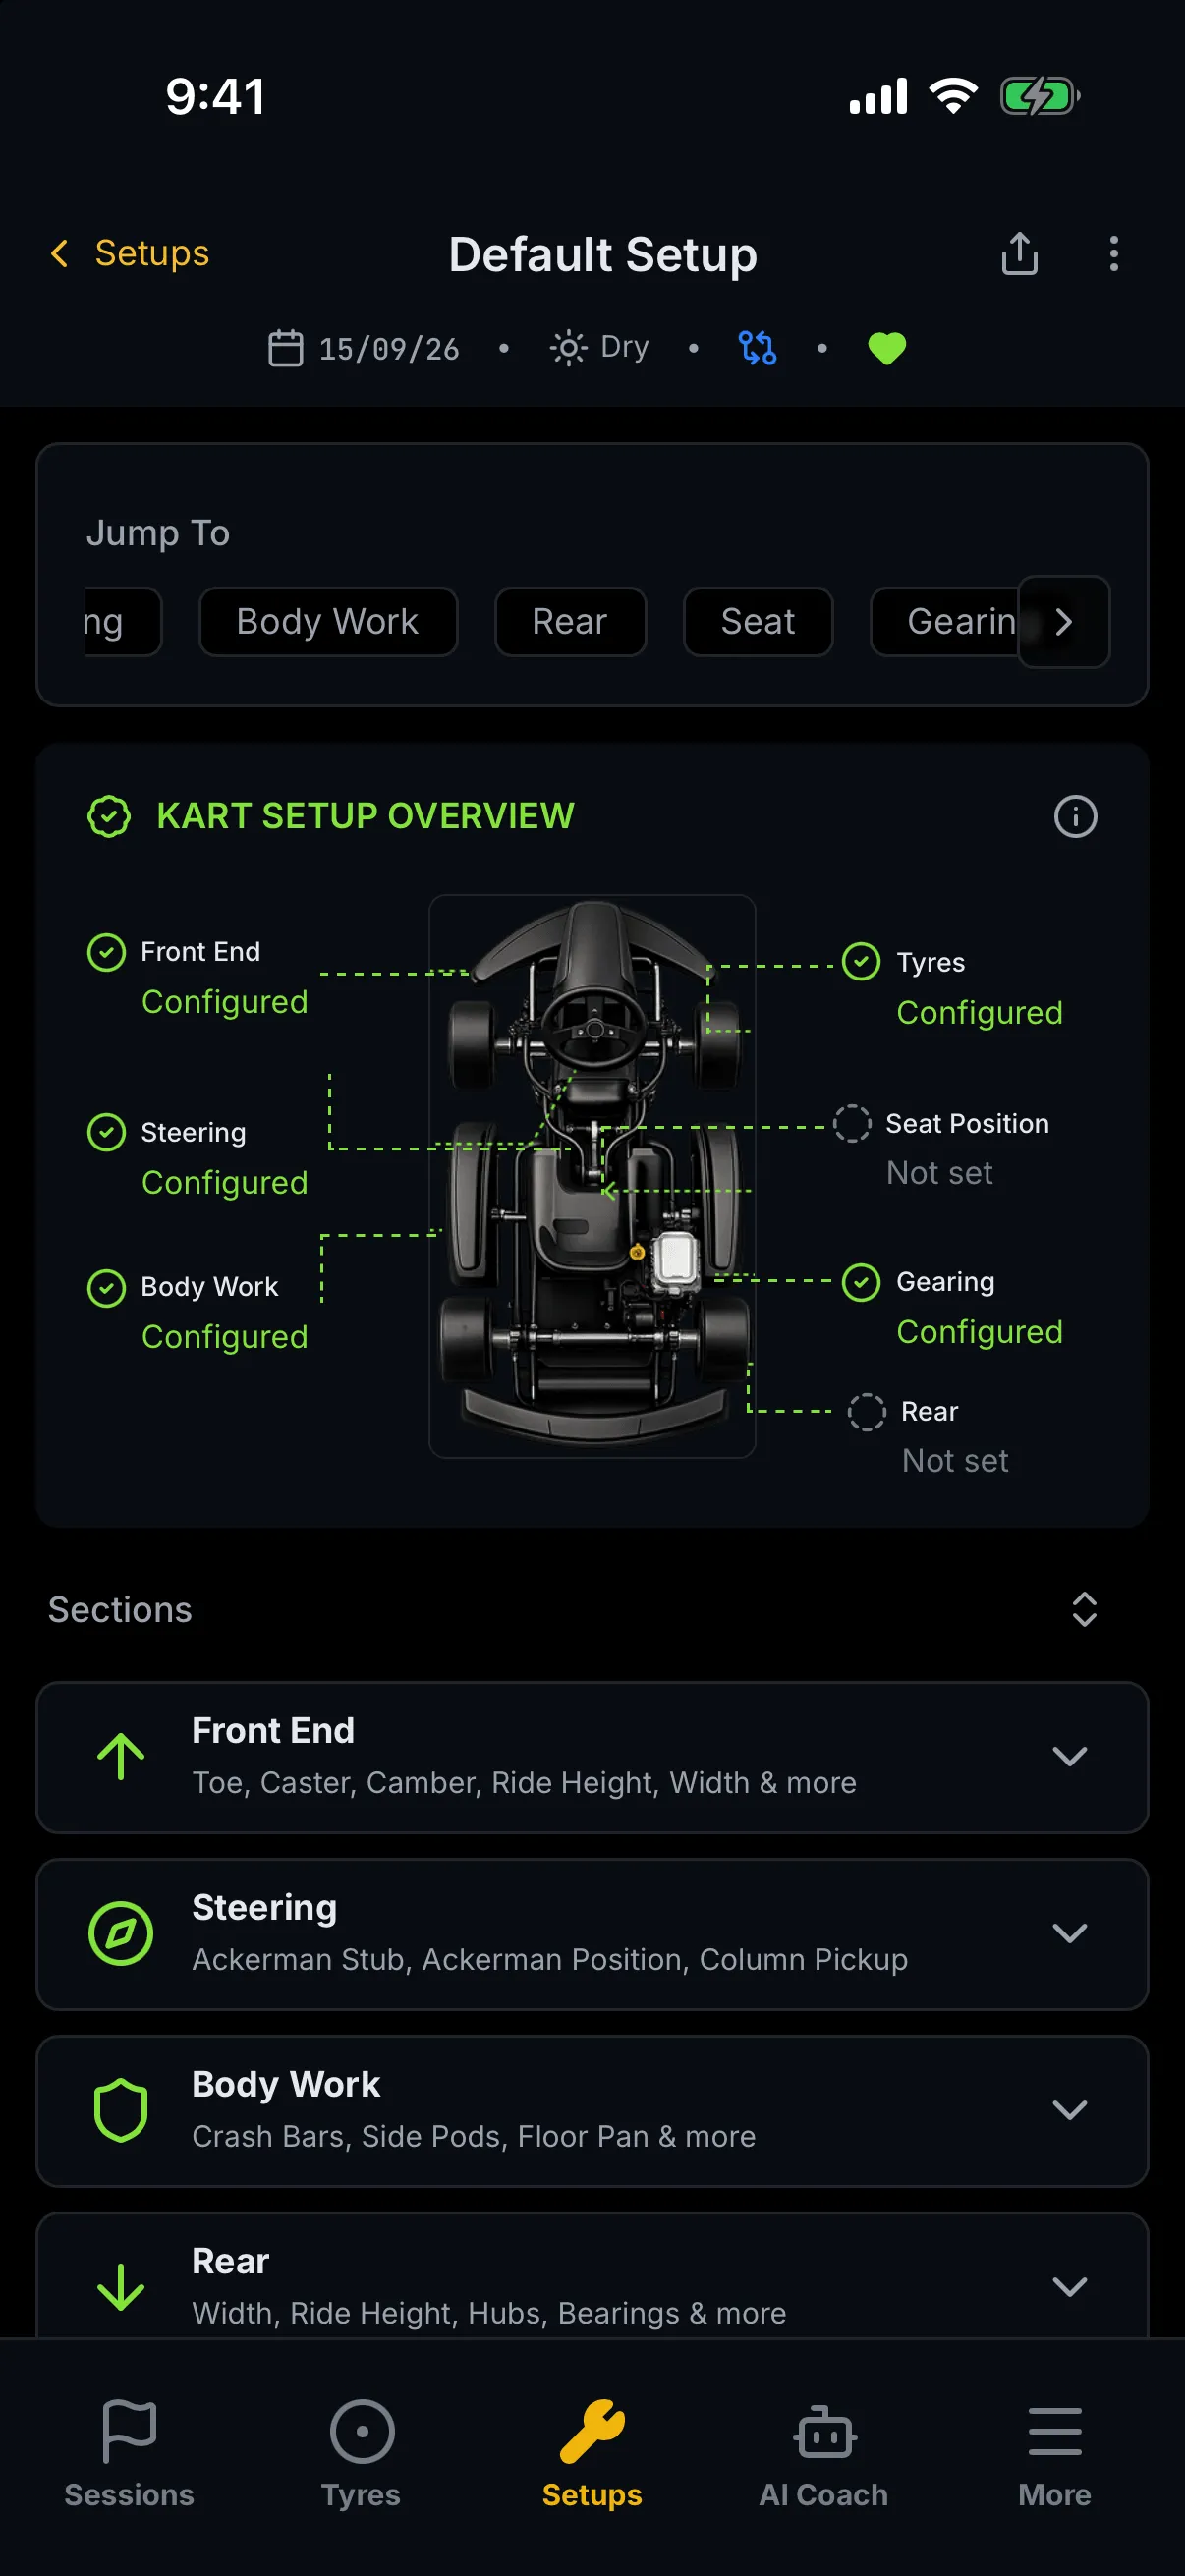
The Jump To rail sits directly under the header and is always there — it does not open or close. Its seven chips are the seven sections, in order:
Front End · Steering · Body Work · Rear · Seat · Gearing · Tyres
They do not all fit across a phone, so the rail scrolls sideways. A chevron at the right-hand edge nudges it along; it disappears once you reach the end.
Tapping a chip does two things: it opens that section and scrolls you to it. Sections you had already opened stay open. Tapping the chip of a section that is already open simply scrolls back to it — it does not close it. Only the section card's own header closes a section.
As you scroll the page by hand, the rail keeps up: the chip for the section you are reading is highlighted in green.
The fifth chip says Seat; the card it takes you to says Seat Positioning. The same section is also labelled Seat Position on the Kart Setup Overview. Three names, one section.
Kart Setup Overview
The card under the rail is a top-down drawing of a kart with seven labels around it — one per section. Its heading reads KART SETUP OVERVIEW.
Each label carries one of two words:
- Configured — every core field in that section has a saved value;
- Not set — one or more core fields are still empty.
Tapping ⓘ on the card explains those two words in the same terms.
Three things about this card are worth knowing, because none of them is obvious:
- It reports what is saved, not what you have just typed. Fill in a section and it keeps saying Not set until you press Save Setup.
- "Every core field" does not mean every field on the section. Some fields are deliberately outside the check — settings that only appear on some karts, and values Apex works out for you, such as the gear ratio. A section can read Configured with blanks still visible in it.
- The labels are not buttons. Use the Jump To rail to move to a section.
The reading order runs down the left of the kart and then down the right — Front End, Steering, Body Work, then Tyres, Seat Position, Gearing, Rear — which is not the order of the section cards below.
The seven sections
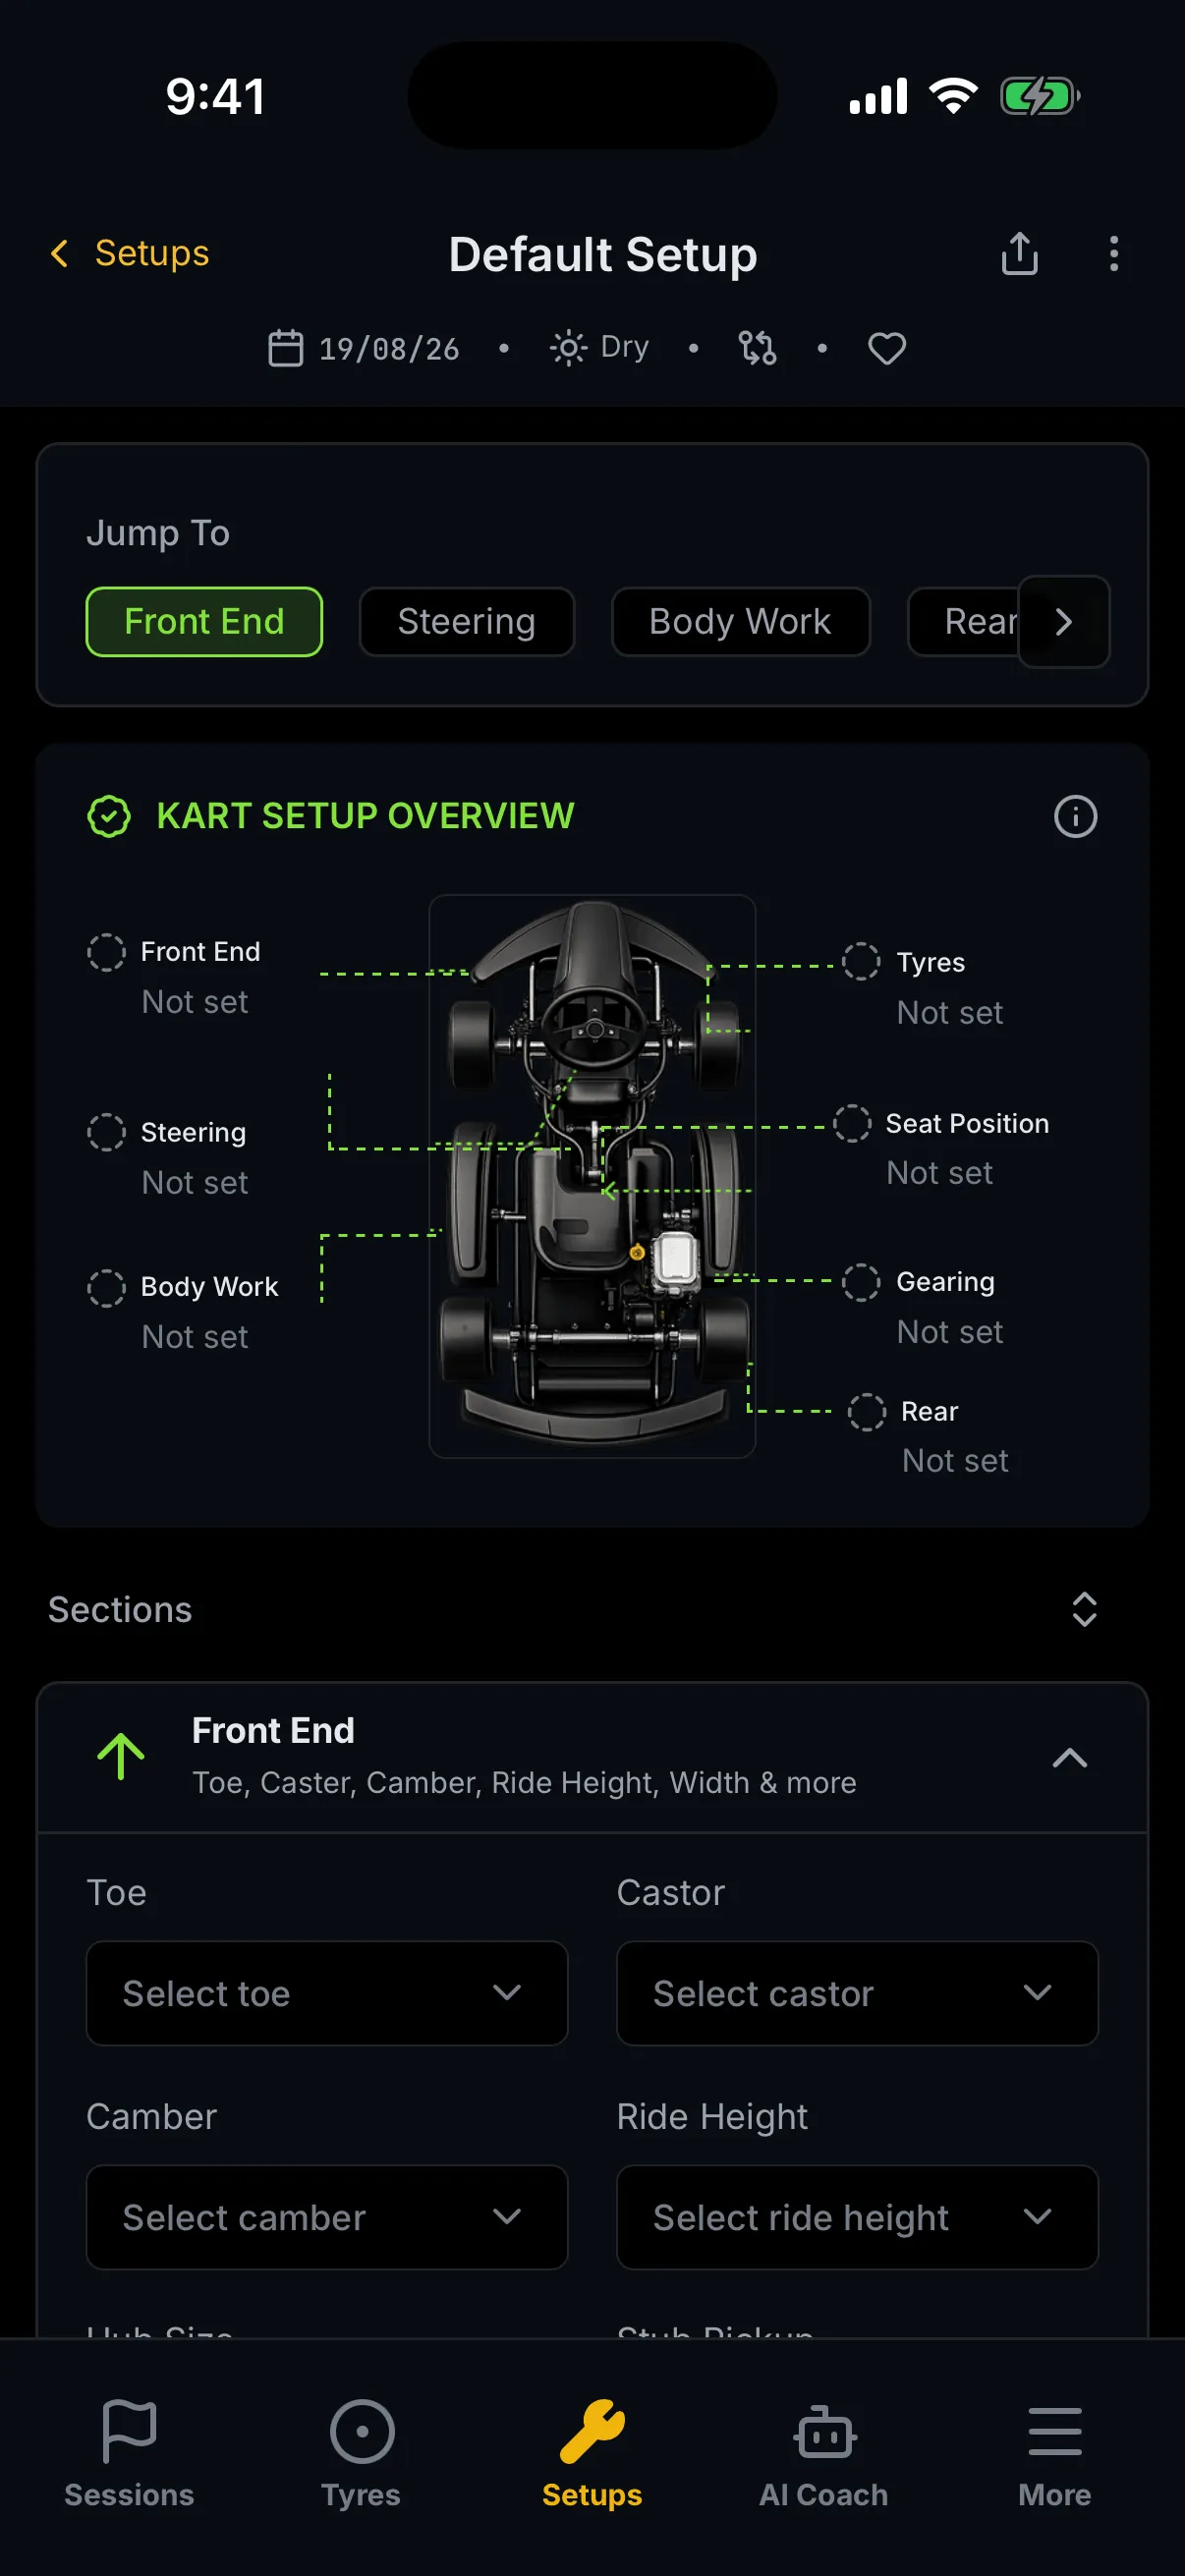
The picture above is a different setup from the rest of this chapter — one that has just been created and has nothing entered yet. It is here because it shows what a blank section looks like: every dropdown showing its placeholder, and every label on the overview reading Not set. Your first setup will look exactly like this.
Below the overview, a row reading Sections carries a single control on its right: expand all / collapse all. Then the seven section cards.
Sections open independently and never close each other. Open two and compare them; open all seven with the control above. Each card shows its name, a one-line summary of what it holds, and a chevron that turns as it opens.
Front End
Toe, Castor, Camber, Ride Height, Width & more
| Field | Control | Values |
|---|---|---|
| Toe | dropdown | from your toe catalogue |
| Castor | dropdown | from your castor catalogue |
| Custom Castor | text | appears only when Castor is set to Custom |
| Camber | dropdown | from your camber catalogue |
| Ride Height | dropdown | from the shared ride-height catalogue |
| Hub Size | dropdown | from the shared hub-size catalogue |
| Stub Pickup | dropdown | from the shared stub-pickup catalogue |
| Width (mm) | − / + buttons, plus preset chips | 0 to 50 mm in steps of 5 |
| Torsion Bar In | switch | not shown on a Cadet kart |
| Torsion Bar Used | text | appears only while Torsion Bar In is on |
Beneath the fields, an Alignment Tool Preview draws your toe and camber on a grid, with TOE OUT and TOE IN along the top and NEGATIVE CAMBER down the middle. It is a picture, not a control — you cannot drag it, and it fills in from the Toe and Camber dropdowns above. Its caption calls the marker a red dot; it appears only once both Toe and Camber are set.
The pictures in this chapter say Caster on that summary line; the app now says Castor. Both spell the same setting. The app used to carry both spellings at once — the summary line said Caster while the field inside said Castor — and that was fixed after these screenshots were taken. Castor is the spelling Apex uses.
Width reads
0 mmbefore you set it. That is the blank state, not a measurement.
Steering
Ackerman Stub, Ackerman Position, Column Pickup
Two picture-choices rather than dropdowns.
| Field | Control | Options |
|---|---|---|
| Ackerman Position | tap one of two photo cards | Inside Ackerman — "More steering at corner entry" · Outside Ackerman — "Decreased steering at corner entry" |
| Column Pickup Position | tap one of two photo cards | Standard · Higher / decreased |
The red and blue rings in the photographs are part of the pictures and match the wording beneath them. If your saved value does not match either card, the section shows it as a read-only tile labelled Stored value instead — it looks like a selected card, but it is not one; pick a card to replace it.
The summary line promises an Ackerman Stub control. There is not one on the phone — the stub is part of the Ackerman Position pictures.
Body Work
Crash Bars, Side Pods, Floor Pan & more
Five dropdowns, all tightness or material settings:
| Field | Values |
|---|---|
| Lower Crash Bar | from your crash-bar tightness catalogue |
| Upper Crash Bar | from your crash-bar tightness catalogue |
| Side Pods | from your side-pod tightness catalogue |
| Floor Pan Material | from your floor-pan material catalogue |
| Floor Pan | from your floor-pan tightness catalogue |
Rear
Width, Ride Height, Hubs, Bearings & more
The section opens on the rear track width, because it is the setting most often changed between sessions.
Width (mm) is a ruler you drag, with the value in green above it and a drawing of the axle from behind between Narrower (Wheels In) on the left and Wider (Wheels Out) on the right. The helper line states the effect plainly: "Wider rear track reduces rear grip. Narrower rear track increases rear grip."
The range depends on the class of kart, and this is the field where that matters most:
| Class | Range | Step |
|---|---|---|
| Senior | 1340–1400 mm | 5 mm |
| Cadet | 1075–1120 mm | 5 mm |
Then:
| Field | Control | Shown |
|---|---|---|
| Axle Length | dropdown | not on a Cadet kart |
| Rear Hub | dropdown | always |
| Ride Height | dropdown | not on a Cadet kart |
| Third Bearing | dropdown | not on a Cadet kart |
| Axle Type | dropdown | always — but it needs a kart with a chassis brand first, and says so: Select kart with chassis brand first |
| Bumper Vertical Clamps | tap one of two cards | always |
Unlike the front width, an unset rear width shows —, not a number.
Seat Positioning
Seat Brand, Model, Bolts & Ballast
| Field | Control | Notes |
|---|---|---|
| Seat Brand | dropdown | — |
| Seat Model | dropdown | choose a brand first |
| Seat position measurement | number, in mm | on the SEAT POSITION MEASUREMENT card |
| Ballast Position | tap a dot on the seat diagram, or a dropdown | see below |
| Bolts | tap one of two cards | tight or loose |
| Position | dropdown | — |
| Stays | dropdown | not on a Cadet kart |
The measurement card carries the instruction with it: "Measure from the rear axle to the middle of the back of the seat on a 45 degree angle." Type the figure into the tile marked Current.
BALLAST POSITION shows the back of the seat with its mounting positions marked; tap one. A tile beside it reads Selected Position and names your choice, or Not set. Where your ballast positions do not match the positions on the drawing, a plain dropdown appears as well — or instead — so that every position you have is reachable. Tap ⓘ for what each position means.
Gearing
Sprockets, Gear Ratio
| Field | Control | Notes |
|---|---|---|
| Front Sprocket | dropdown | from your front-sprocket catalogue |
| Rear Sprocket | number | suggested range 64–88; outside it you get "Must be between 64 and 88." — a warning, not a block, and it still saves |
| Gear Ratio | read-only, badged Auto - Calculated | rear ÷ front, to three decimal places; — until both sprockets are set |
Tyres
Tyre & Wheel Brands, Pressures
| Field | Control | Notes |
|---|---|---|
| Tyre Brand | dropdown | your tyre manufacturers |
| Compound | dropdown | choose a tyre brand first |
| Cold Pressure | four gauges | in PSI |
| HOT PRESSURE | four gauges | in PSI |
| Wheel Brand | dropdown | your wheel manufacturers |
| Wheel Model | dropdown | choose a wheel brand first |
| Track Direction | dropdown | changes how the gauges are labelled — see below |
Each gauge takes a figure directly, or you can step it with the + and − buttons in 0.1 PSI. There are eight in all: four cold and four hot.
What the four gauges are called depends on Track Direction. Set it, and they are wheels — FL (Front Left), FR (Front Right), RL (Rear Left), RR (Rear Right). Leave it unset and they are loads — Outside Front, Inside Front, Outside Rear, Inside Rear. The field says so itself: "Drives the FL/FR corner labels on the pressure gauges; leave unset to label corners Outside/Inside."
These are the pressures recorded on the setup. To work out what your pressures should be, use Trackside Tyres — a different screen and a different job.
Reset to Default
Every section except Front End ends with a red Reset to Default link.
It undoes your unsaved edits in that section, putting the fields back to the values the setup was last saved with. It affects that section only, it does not touch the other six, and it changes nothing on the server — it is an undo, not a save.
It is not the cascade's reset. On the dashboard, an event or session override has a Reset to inherited control that removes an override so the value falls back to the layer above — see Setups. This is a different control with a similar name. Nothing on the trackside editor inherits from anything; "Default" here means the values already saved on this setup.
Saving your changes
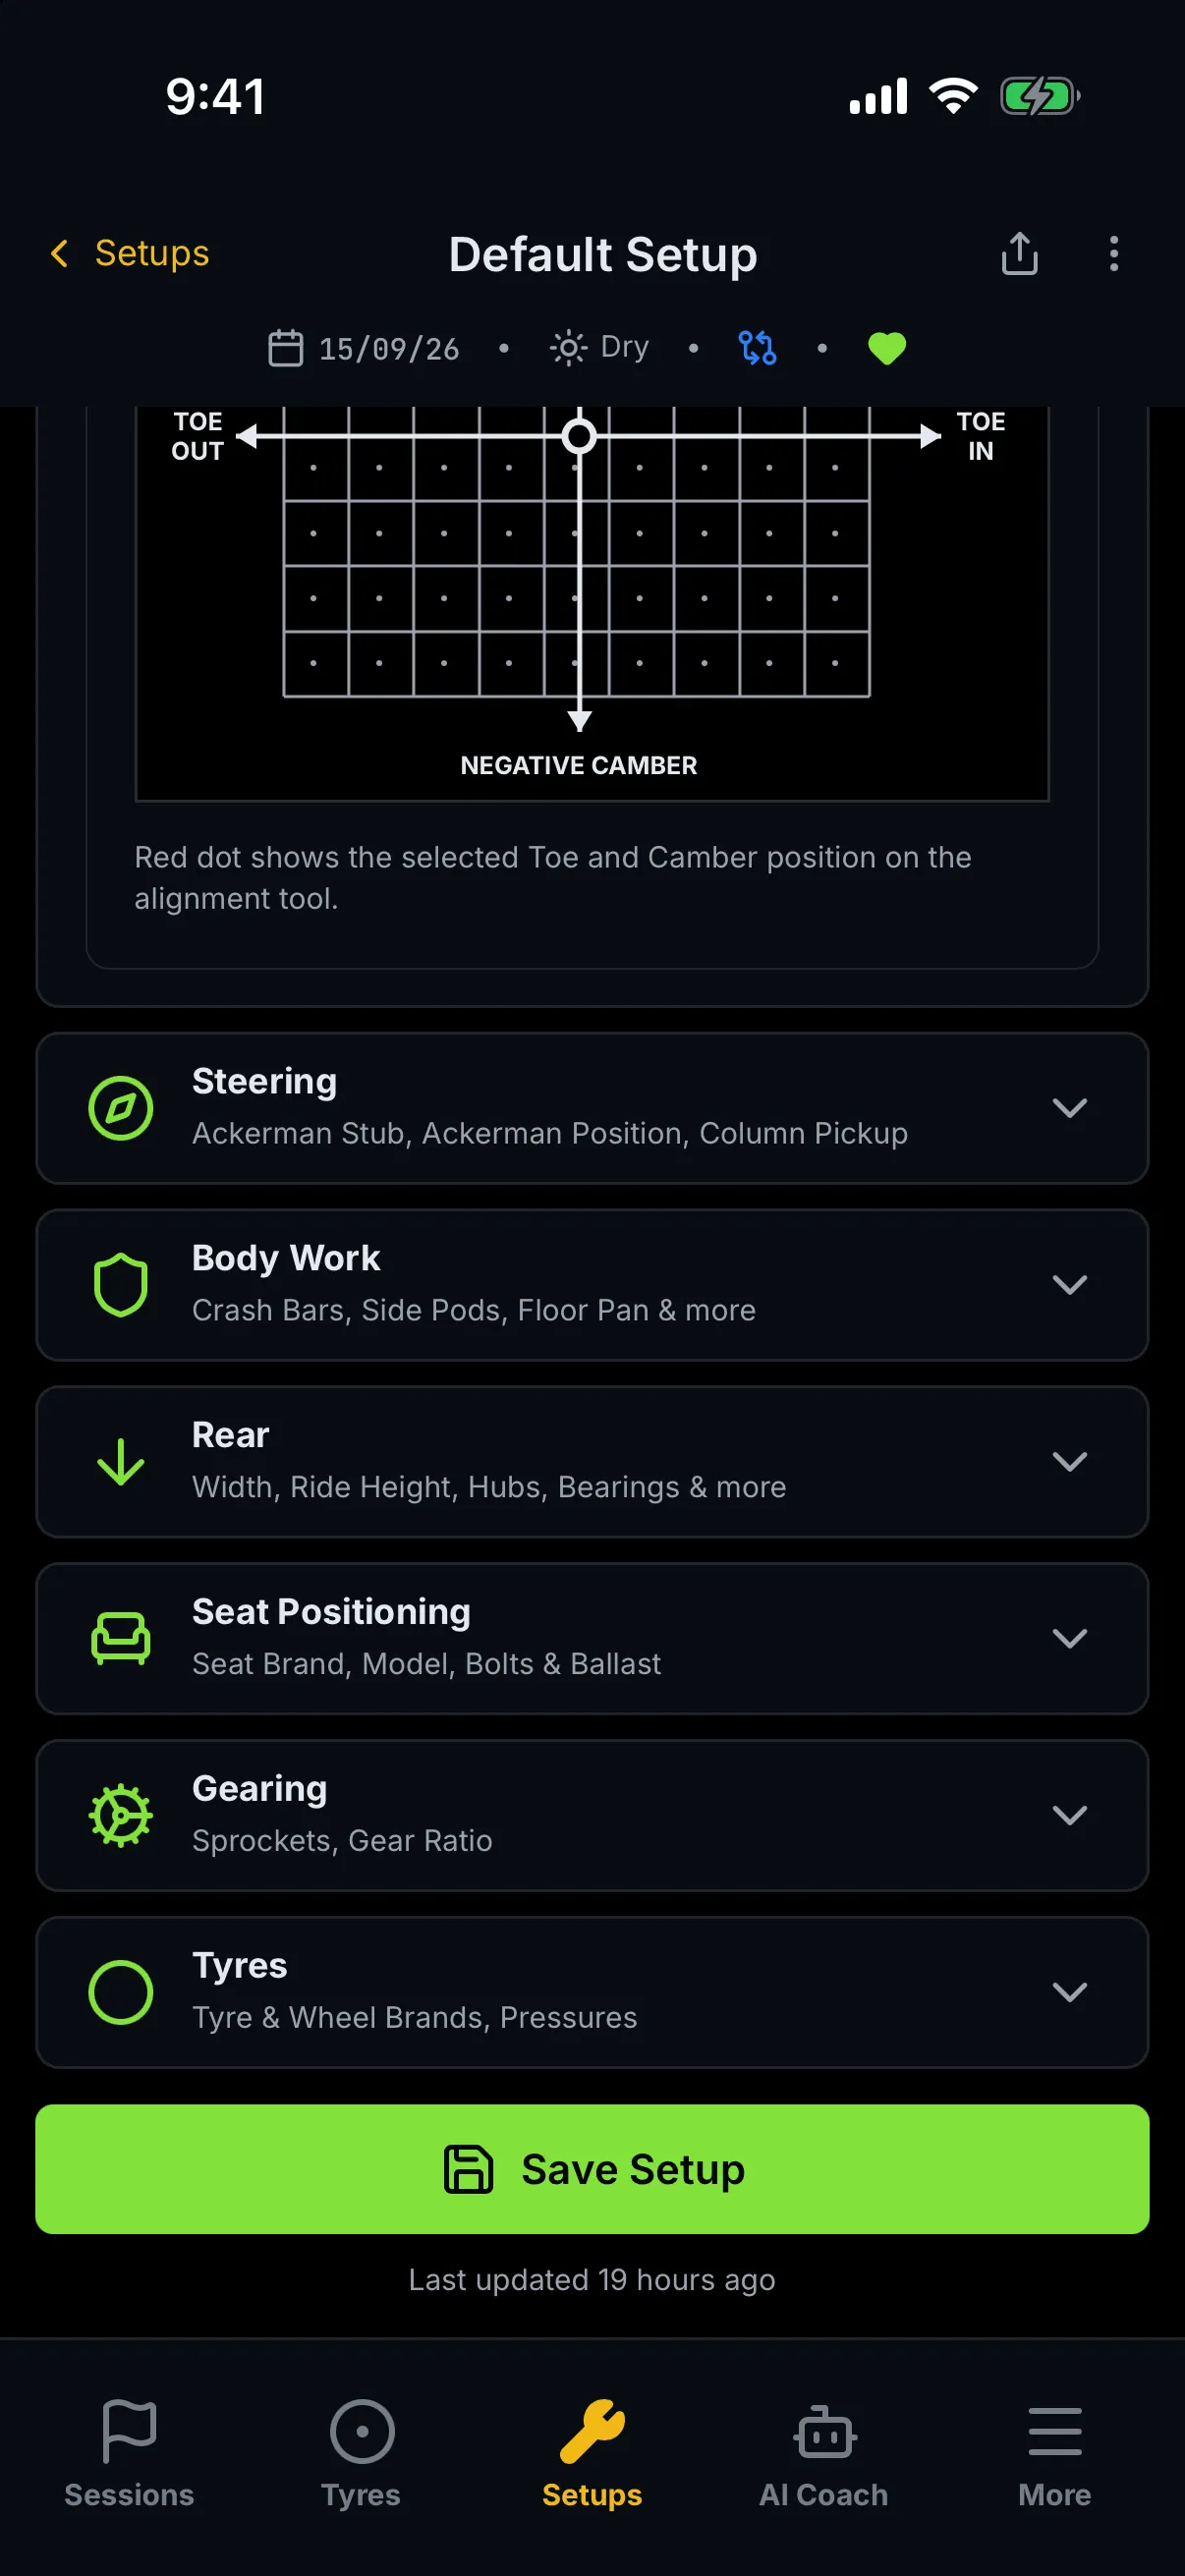
Save Setup sits at the very bottom of the page, after the last section — it does not follow you down the screen, so you scroll to it. It is greyed out until you change something and lights up green when you do. Beneath it, Last updated tells you how long ago the setup was saved.
Saving sends only the fields you actually changed. A success is confirmed with "Setup updated." If it fails you get a message saying so, your changes stay on screen, and you can press Save Setup again.
Leaving without saving
This is the most important thing on the screen. If you have unsaved changes and you tap ‹ Setups, the back arrow, or any tab in the bottom bar, Apex does not warn you. The screen changes and your edits are gone.
Closing or reloading the browser tab does prompt you — that warning comes from the browser itself, not from Apex — but moving around inside the app does not.
So the habit worth building is simple: change one thing, press Save Setup, then move on. On a phone between sessions that is also the fastest way to work, because a short save is quick and a lost session's worth of notes is not.
Empty, loading and error states
| Where | You see | What to do |
|---|---|---|
| Picker, loading | Four grey placeholder rows | Wait |
| Picker, no setups | No setups yet and a Create setup button | Tap it — you get a working setup in one tap |
| Picker, nothing matched | No matching setups | Clear search or Clear filter |
| Picker, request failed | Couldn't load setups | Retry |
| Editor, loading | An empty title and blank cards | Wait |
| Editor, request failed | Couldn't load this setup. | Back to Setups, then try again |
| A dropdown that will not load | Failed to load options, and the dropdown is disabled | Check your connection; the rest of the form still works |
| A setting not in your catalogue | Not yet catalogued | The setting has no options on this account yet |
A dropdown holding a value that is no longer offered still shows that value, but will not offer it again once you change it.
Walkthrough: record a rear-width change between sessions
- Tap Setups in the bottom tab bar. What you'll see: your setups, newest information first.
- Tap the setup you are running. What you'll see: the editor, with every section collapsed and the Kart Setup Overview showing which parts of the kart are filled in.
- Tap Rear on the Jump To rail. What you'll see: the Rear section opens and the page scrolls to it.
- Drag the Width (mm) ruler to the new figure. What you'll see: the green figure above the ruler changes in 5 mm steps, and Save Setup lights up.
- Scroll to the bottom and press Save Setup. What you'll see: "Setup updated.", and Last updated resets to just now.
- Optional. Scroll back up to the Kart Setup Overview. What you'll see: Rear now reads Configured — it updates only once the change is saved.
Walkthrough: start a setup from nothing
- Tap Setups in the bottom tab bar. What you'll see: No setups yet, and a Create setup button.
- Tap Create setup. What you'll see: "Setup created.", and the editor opens on a setup called Default Setup, marked dry, attached to your primary kart. Every label on the Kart Setup Overview reads Not set.
- Tap expand all beside Sections. What you'll see: all seven sections open at once.
- Work down the kart, filling in what you know. Press Save Setup as you finish each section rather than at the end. What you'll see: each section's label on the overview turns to Configured as its core fields are saved.
Where to next
- Setups — building a setup on a laptop, track defaults, and how event and session overrides inherit from them.
- Trackside Tyres — working out the pressures to put in the gauges on this screen.
- Trackside Sessions — what the kart did once you sent it out.
- Unfamiliar word? See the Glossary. Stuck? See Troubleshooting & FAQ.